If you're looking to create energy-efficient and atmospheric lighting in your home, dimmable LED spotlights are a great choice. By connecting them to a compatible dimmer, you can adjust the brightness to suit your mood and needs. In this article, we explain how to safely and correctly wire LED spotlights to a dimmer, what you need to consider, and which combinations work best.
Before you begin, make sure you have the right materials:
Note the difference between 230V LED spotlights (usually GU10) and 12V spotlights (often MR16). 12V models require a suitable transformer, preferably an electronic LED driver instead of a halogen transformer.
Not all dimmers work well with LED lighting. Always use a dimmer explicitly designed for dimmable LEDs. There are two main types:
Pay close attention to the minimum and maximum load supported by the dimmer. Many LED dimmers only work properly within a specific range (e.g., 3 to 100 watts). If you connect too little load, the lights may flicker or not switch on at all.
Go to your fuse box and turn off the circuit breaker for the lighting group you’ll be working on. Always use a voltage tester to confirm the power is off.
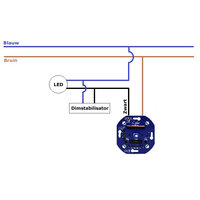
Remove the existing switch and wire in the new dimmer according to the manufacturer’s instructions. Connect the live wire to the “L” terminal and the output to the terminal marked with an arrow or “LOAD”.
Mount the spotlights into their fixtures or recessed housings. Connect the brown (live) and blue (neutral) wires properly. If you're using 12V LED spotlights, connect them to the output of the LED driver, which in turn connects to the mains power.
Restore power and test the dimmer. Check if the LED spotlights turn on and dim smoothly. If flickering occurs, try adjusting the minimum brightness on the dimmer if available.
When connecting LED spotlights to a dimmer, avoid these common mistakes:
Want even more control? Consider a smart dimmer, such as one from Fibaro or Busch-Jaeger ZigBee, to control your spotlights remotely via smartphone or integrate them into your home automation system.
With the right preparation and a compatible dimmer and LED spotlight combination, you can easily create a flexible, efficient, and cozy lighting setup in your home. Always verify compatibility and follow a safe wiring process for the best results.
No comments found.
