The Fibaro Dimmer 2 is a smart Z-Wave module that allows you to dim and control your lighting wirelessly via your home automation system. This compact in-wall dimmer fits behind an existing wall switch and supports both trailing-edge and leading-edge dimming. In this guide, we’ll walk you through how to install the Fibaro Dimmer 2, what tools you need, and what to keep in mind for a safe and successful installation.
Before you begin, make sure you have the following components and tools:
Note: The Fibaro Dimmer 2 can be used with or without a neutral wire. This makes it suitable for older installations, as long as the connected load meets the minimum requirement (at least 25W). However, using a neutral wire is highly recommended, especially for LED lights.
The module has several terminals. Here is what each one is for:
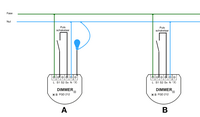
Basic wiring with neutral wire:
Without a neutral wire: You can connect the dimmer without using N, but this may require a higher minimum load and is less reliable with low-wattage LEDs.
Once the wiring is done, carefully place the dimmer behind the switch inside the wall box. Turn the power back on and check if the light responds to manual switching.
You can now rename the device in your smart home app, assign it to rooms, and configure advanced settings such as dimming behavior and scene triggers. The module also measures power usage and supports multi-click actions on S1 and S2.
To ensure a trouble-free installation, keep these points in mind:
The Fibaro Dimmer 2 is a powerful and flexible solution for smart lighting. With support for both neutral and 2-wire installations, it’s one of the most versatile modules available. When installed correctly, it allows for seamless integration into your smart home while maintaining full manual control.
No comments found.
